Animation Fields and Field Sizes
In 2D animation, centimetres and inches are used to specify distances and lengths, but there is another measurement system used unique to animation: fields.A field is a measurement of area rather than length; think of a field as being the shape of a TV screen. A drawing that is 1 field in size will be a small rectangle that is one inch across and about .75 inches high. A 6 field drawing will be 6 inches across, and so on.Let's start by looking at how the size and framing of animation drawings are specified. It is important that everyone working on an animated production knows this. There are standard ways of achieving this very easily.To create 2D drawn animation, you use punched paper which sits on a pegbar for registration.
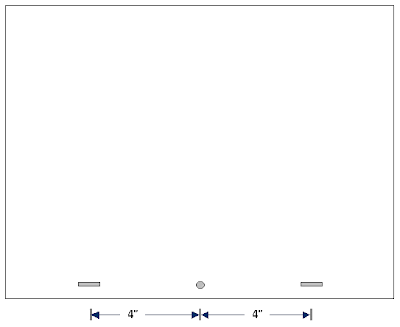
In the UK, “Acme” pegs are used – these are the familiar two slot shaped holes and one round hole as shown in the illustration below. In the examples to follow, the peg holes are at the bottom of the paper so are called "bottom pegged”.Let us suppose that you are ready to animate. You have a pile of punched paper and a lightbox on which to work complete with a pegbar.Each sheet of paper will look something like this:
 Where is the actual drawing area? The animation paper is blank, so there is no initial clue as to where the edges of the drawing should be.
[For the time being, assume you are going to produce animation in the normal TV screen shape and not the letterbox (widescreen) shape.This will be dealt with later].
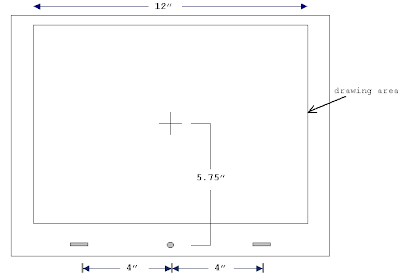
Below, the illustration indicates a normal drawing area together with some dimensions in inches.
There are three things you need in order to accurately describe the size and position of an animation drawing:its shape
its size
the location of its centreThe shape of the example shown above is 4 x 3 which means it is 4 units across by 3 high. (4 x 3 = four by three).Size: animation drawings are made to certain fixed field sizes, usually between 3 and 12 inches.The size of the drawing above is 12 field (written as 12F) – this means it is 12 inches wide and roughly 8.85 inches high (roughly 4 x 3). A 6Fdrawing would be 6 inches across, and so on.The actual size you make your drawings when you animate is a matter of personal choice. The 12F size is commonly used in the UK for TV production so is a sort of default size; you may feel more comfortable working at, say an 8F instead. There are also larger standard field sizes in animation, mostly used for cinema work where greater accuracy of drawing is needed. The largest commonly used field size is probably 16F, (mostly used in the USA). The shape, on the other hand is entirely dependent on the final means of transmission; if it's a piece of animation for the Internet, the shape is arbitary, but for television or cinema use, you must work to the shape of the screen that the animation will be seen on.Its centre is located 5.75 inches immediately above the centre of the round peg hole.In the illustration below, the cross marks the centre of the drawing area - and that is the same as the centre of the animation when it is seen by the viewer.You can also think of the cross as representing the middle point of the viewfinder of the camera that will be used to film your animation. Nowadays, of course, a real camera may never be used to film the animation, but you will find that almost all professional animation programs will continue to use the term "camera" as it makes life a lot easier.

The cross is the centre of your drawing area and it is also the centre of the camera's viewfinder. It is therefore the centre of the final image as it will appear when it is broadcast or projected.
ALWAYS specify the centre of all artwork, preferably with a drawing, unless it is at the default centre as seen above; in this instance you can specify it by writing on the dopesheet that the size is :
This stands for "12 field centre", the crossed "C" signifying the Academy centre. (The crossed C can be used with any field size, not just 12, of course).
The easiest way to produce your work at a standard size (and of knowing where the centre is) is by getting your hands on an animation graticule (also called a field chart). Normally these show all the field sizes from 1F to 12F
A typical 12F Academy Field Chart:

Hopefully, the above should now be obvious as to its design and use. Field charts printed on acetate are available from animation supply companies.
There are also field charts available for larger field sizes. Unfortunately, if you are working in 4 x 3 shape, the centre cannot stay the same for larger field sizes as you would find that the pegbar would have to be placed within the artwork area. There are therefore different standard centres for larger field sizes.
An added complication nowadays is the need to produce animation for widescreen (also called "letterbox") shape. In fact, if you work on a 15F widescreen, you can keep to the standard 12F centre.
The simplest way to avoid all possible confusion is: draw a camera guide!
The basic widescreen shape is 16 x 9 and when you animate for that shape, you should act as though your field chart is the shape below:

I am not aware of these being available commercially; however, if you have a look at the notes on this site about designing for widescreen, it should be obvious how to deal with the matter. The real problem is in making sure that animation will work in 4 x 3 shape and 16 x 9 shape and sometimes also the compromise 14 x 9 shape and these notes will explain how to cope.
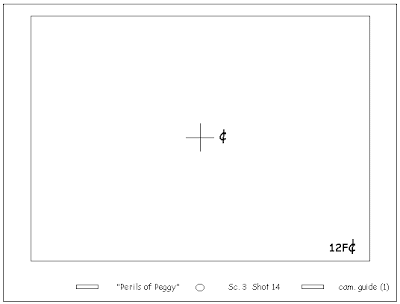
Note: whether you are working in 16 x 9 shape or 4 x 3, if the distance between the chart centre to the pegs is the standard distance 5.75 inches, you can use the crossed C to indicate it is centred; if you place the centre anywhere else, specify where the centre is with a drawing (a camera guide) and do not use the crossed C symbol
A basic camera guide should look something like this:


